Ok I refuse to let myself get behind again on blogging. Because by the end of it, it's just a task and not fun anymore.
Anyway, as you can see, I've done quite a bit, but worry not, I have a ton of ideas floating around! Ahhhhhhhhhh. What am I gonna do when this is over? I may need to learn how to knit or something.
But, for now, I'm not jacking with anymore wedding related stuff until after GI comes home and then leaves again. Christmas has got me so stressed out right now, I don't know where to begin, but I know I need to get something done soon!
I guess this is OK. If I'm stressing about cooking and presents and whatever else, I'm not freaking out him coming home. (mostly). I'm just so ready to see him. It's been a long 8 months and I'm on edge.Oh well, almost two weeks!

Saturday, December 4, 2010
My dress!
If you are my GI.... stop reading right now!
I decided it would be ok to show off the dress because A) He doesn't have the link to this blog and B) I won't show myself in it, just the dress itself.
Anyway, I had no intention to buy my dress until after Christmas, but I ended up with an Amazon gift card from mypoints, some cash in my paypal account from surveys and I realized I had almost enough to get it! So, I added $50 in CHANGE that I rolled and I went for it!!
I bought this dress at Amazon.com and I'm in love. It makes me feel like a bride without a big crazy price tag. I can't wait to wear it! I'm going to do some more searching when it gets a little closer to the date for my Maid of Honor dress and my flower girl dresses.
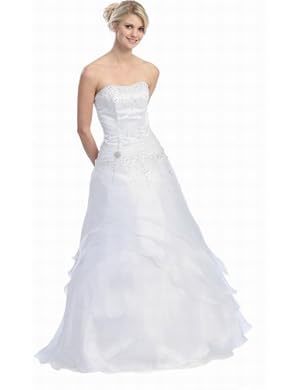 Just look for special occassion dresses and select white dresses under the women's clothing category on Amazon.com. They have a ton of great options that are probably meant to be prom dresses but make excellent wedding dresses for CHEAP! :)
I decided it would be ok to show off the dress because A) He doesn't have the link to this blog and B) I won't show myself in it, just the dress itself.
Anyway, I had no intention to buy my dress until after Christmas, but I ended up with an Amazon gift card from mypoints, some cash in my paypal account from surveys and I realized I had almost enough to get it! So, I added $50 in CHANGE that I rolled and I went for it!!
I bought this dress at Amazon.com and I'm in love. It makes me feel like a bride without a big crazy price tag. I can't wait to wear it! I'm going to do some more searching when it gets a little closer to the date for my Maid of Honor dress and my flower girl dresses.
I heart doilies.
When I think of doilies I think of a little old lady sitting in her rocking chair making doilies for all of her family members to throw into a drawer and never look at again... maybe that's just me.
But then I stumbled across a blog post about using them to make cupcake liners and got very excited about the idea! They are just paper doilies and so easy to make and fancy looking!
I had found directions online here. But I just bought a package of 25 cut them in half and then cut out the middle. wrapped them around a regular liner and voila! oh so cute!

While I was at it, I also made a banner for the candy buffet.
First I painted the doilies. This was STUPID and hard. The first one I laid down on a paper to paint and it stuck, so it ripped in half when I picked it up. I pretty much held it up and painted it above the paper and used light layers of paint. I've read there are colored doilies online. Those would have been so much more worth it!
Anyway, I stenciled the words "L-o-v-e is s-w-e-e-t" on the doilies. And then I carefully used some curling ribbon to attach them. I put tape on one of the holes that was already there, cut the hole and ran the ribbon through so the ribbon wouldn't rip the paper. Very time consuming, but cheap and cute!

DIY Aisle Runner

(names have been scribbled to protect us from online crazies) :)
This is a craft that is VERY popular on theknot.com, and for the longest time I was sure that I wasn't going to do it. I hadn't really planned on using an aisle runner, but the more I thought it, the more it seemed like a wedding isn't a wedding with an aisle runner... don't ask me why, it just seems like one of those elements that I needed.
So, I was totally stoked to pick up my aisle runner at half price at Hobby Lobby during one of their Bridal Blowout sales. This is regularly $30 for 100 yards.
Anyway, there are all kinds of variations online, and some brides will do a design on one end and another design on the other. I have NO IDEA how long my makeshift isle is going to be since we are doing this in an events center, so I just decided to decorate one end.
I scanned the "R" stamp that I picked up at Hobby Lobby (oh I heart that place!) and blew it up into a poster and printed it off. Next I typed up our names and this quote and printed them off as posters as well.
I taped the papers together (they each printed on four sheets) and then one at a time I laid them under the aisle runner and traced the letters with a tiny paintbrush and some leftover paint from my cardbox project. (I used a piece of cardboard under the papers to keep the paint from transferring onto my kitchen table.) It was dry pretty quickly, but I let it sit out for a couple of hours just in case.
I'm in love with the results. :)
Cheap and Easy Centerpieces and flower girl basket redo!
Ok, as you know I ended up throwing the jar centerpieces in the dumpster and started from scratch. I had seen this picture when googling centerpieces at least a thousand times but didn't put too much thought into it.


Well, on the night of the great centerpiece hunt I ran across it at least a million more times and decided I could definitely revisit the idea, but I had to keep it cheap.
I hit Dollar General and bought ten thick walled glass wine goblets and ten ivory colored votive candles. I had bought a boa at Hobby Lobby to redo my flower girl baskets, so I cut the remaining amount in half and wrapped it around the base.
I'm digging the results! I *might* get some sand to put in the glass to hold up the candle, but I'll have to try it out and see.

Oh yeah, I DID redo the flower girl baskets. I took off the ribbons and added some boa pieces that I hot glued to the rims. They are very cute! But it got messy for sure! (hot glue + feathers + clumsy me= my kitchen looking like I killed a hot pink chicken for dinner)

Redo of my tears of joy packets

Every time I looked at the pictures of the tears of joy packets I felt like something was missing and they were just entirely too plain. Since I still have quite a while until the ceremony I don't see any reason to not be 100% happy with all of my little details, so this was as good of a reason as any to do a redo!
I grabbed some more of the damask scrapbook paper that I love so much from Hobby Lobby and sat down with my paper cutter and go to work one night last weekend. I am absolutely stoked about the results.
I made this a little bit bigger by cutting the scrapbook paper into fourths and then folding them from there. (instructions here) When I was done I glued on the "for your tears of joy" labels to the front. For the labels I just printed them off on my printer in two columns, cut them with my paper cutter and glued them on.
LOVE THEM!
NWR: Not wedding related crafts! :) Christmas Garland and stockings

I bought four felt stockings at good 'ole Wal-Mart and printed off our initals. I used a font called Black Rose that I downloaded from dafont.com. I ended up altering the letters a little after I printed them because they were very loopy and complicated, which I wasn't in the mood for while cutting out felt.
I cut out the letters and then laid them down on top of some black felt that I already had laying around and cut around the letters since tracing didn't seem like it would be possible on black felt.
When I was done I glued them to the stockings with some Elmer's Glue and TA DA! Four stockings for $4!
When I was done with that I decided I was in love with felt and wanted.. needed... to do some more. So, I decided to make some garland to hang above our tv on the shelf (since I don't have a mantle, booooo).

First I used a drinking glass to trace circles onto the red and green felt, and then freehanded the top of the ornaments and cut them out also. Next, I glued the ornament tops to the circles and hot glued them onto pieces of curling ribbon. I alternated lengths, no real measurements... sorry!
When I was all done I glued the hanging ornaments to a long piece of ribbon and tacked them to my shelf.
This was a super easy craft that took about 30 minutes and added a little extra something to living room for free!

Saturday, October 30, 2010
DIY #12~ Bouquets for $16.00!

One of the biggest items on my budget was my bouquets.
Well I don't want anything extravagant, my only true requirement was pink daisies. :)
When I went to Dollar Tree to pick up the flowers for my centerpieces I found that they had a ton of daisies that looked as good as the ones at Hobby Lobby for a fraction of the price. $1 per bush! I bought 5 bushes~ 3 of them were all pink and the other two were white, pink, and red. (tossed the red)
I removed all the flowers from the "bushes" by cutting the wires at the bases. Next I removed the leaves and had a fantastic pile of flowers.
I bent the stems near the top to make the flowers arch over and then gathered them in my hand and arranged them that way.
When I had them the way I liked them I wrapped rubber bands around them to keep them in place.
Next I used some more floral tape and wrapped it all around the stems to keep them together.
I finished them each off with some navy blue ribbon that I had laying around. And ta-da! Done!

Toss Bouquet

MOH Bouquet
Edit: I edited this! Had a change of heart about the bouquets last weekend and decided to redo them. I made both of these a little bigger and then redid my bouquet for another $6.
Here's my new updated bouquet!

DIY #11~ Signature Mat Pens and vase
I'm going to use a signature mat in lieu of a guest book. I hate the idea of having a book that will just sit in a box or a drawer and never looked at again.
I picked up a photo mat at Hobby Lobby during one of their sales for a little less than $2.00. (I'll get it all worked up and posted at some point in my life.)
I had to do something cute with the pens for the mat and this was a super easy craft!
 I picked up some ink pens from Dollar General ($1 for 10), some floral tape at Hobby Lobby ($1.99) and used the left over flowers that I had from my card box.
I hot glued the pen to the flower just to hold it in place and wrapped the floral tape all around the pen and the flower stem.
 Easy as pie!
Next, I thought... well I need to make a "vase" to put these in! I've been saving jars for the past couple of months, thinking I might have a use for them. Score! I used some more scrapbook paper and wrapped a jar with it. Then I hot glued some ribbon around the neck and TA-DA!

I picked up a photo mat at Hobby Lobby during one of their sales for a little less than $2.00. (I'll get it all worked up and posted at some point in my life.)
I had to do something cute with the pens for the mat and this was a super easy craft!

I hot glued the pen to the flower just to hold it in place and wrapped the floral tape all around the pen and the flower stem.

Next, I thought... well I need to make a "vase" to put these in! I've been saving jars for the past couple of months, thinking I might have a use for them. Score! I used some more scrapbook paper and wrapped a jar with it. Then I hot glued some ribbon around the neck and TA-DA!

DIY #10~ Tears of Joy Packets!

This is another cute one that I've seen all over TheKnot.com... yes it's a little corny, but I like it none the less. They are little packets to put tissues in for the ceremony. I don't have tissues in mine yet.. because they are going to be packed away until August, but it'll be easy to slip a couple of tissues in each packet when it's time.
I got the instructions from this site: http://www.projectwedding.com/wedding-ideas/diy-wedding-challenge-tears-of-joy-packets
It was really easy to do, and the more I did, the faster I was able to work. Great project during my downtime for sure. :)
I made 15 of them (very small guest list, and I doubt everyone will be a "crier".)
It feels great to have so much done already!
Total cost: $2.59 (5 sheets of hot pink cardstock scrapbook paper!)
DIY #9 Wedding color books!

We are going to have a lot of kids at the wedding... and I want to make sure that they are entertained and can have a lot of fun too.
I've seen a lot of posts on the knot about wedding coloring books on TheKnot.com and knew I just had to make some.
I picked out the pictures that are listed below (google is my friend!), printed them off as 3 x 5 pictures. Then stacked them and hole punched the top and finished off with some curling ribbon! I edited the front page with a photo editing program to add our names and a title.
Blocked out the names because... well, this IS the internet.
I'm going to get some little boxes of crayons to add to the basket and put these on the kids table. :)


Sunday, October 17, 2010
DIY #5- # 8! Bride Necklace, MOH Necklace, flower girl necklaces, flower for my hair
This weekends project was fairly easy and super duper cheap. Whoot whoot! First, I made 4 necklaces for $11. I bought a $9 package of glass pearls from Wal-Mart and a $2 roll of "fishing wire". I don't know what it's actually called, but it's the transparent beading wire. For my MOH necklace I used some glass pearls I already had. Strung them on the string and voila! Done in no time. (Like 10 minutes, but I like to bead in my spare time anyway.) I added an extender that I had laying around in my jewelry box so she can adjust the length, but I'm sure you can pick those up at craft stores too.

The flower girl necklaces are pink and blue glass pearls from the package that I picked up. I figured why not? They match the wedding colors and it saved me from buying more pearls. I had the girls try them on tonight and they look great! The girls are soooo excited to get to wear them in the wedding.

My necklace was a little harder. I used ALL of the white pearls that were in the wal-mart package, as well as a few (maybe 15?) small pearls I had in my craft box. I tied three strings to a jump hook on one end and just starting adding beads. The bottom string is about 7 inches long, the second is 6 inches long and the third is 5.5 inches long. For the bottom I used the largest beads, for the second I used large beads on the outsides (10 on each side) and then used the next size down, and on the third I used 1 large pearl, 7 medium sized on each side and then the tiny ones. I'm really happy with the end it turned out. It took me ALL day to make it the way I wanted it, but I'm pleased. I also added an extender to that one so I can adjust the length.

When I went to David's Bridal and found THE PERFECT DRESS the lovely sales lady had me also put on a veil. I pushed back, I don't need a veil, I'm not wearing one... "But it's your wedding day and it's the only day you'll get to wear one and you'll feel like a bride and blah blah blah". So, I gave in. She brought me a really pretty simple, ribbon edged one layer veil and this pretty flower for my hair. She put them on me and I feel in love instantly. I knew I had to have them at that point.
So, that night I came home and looked online... well the veil was $150 and the flower was $90! $90 #?*!ing dollars for a FLOWER. No way, no how, not gonna happen.
Well, I hit up Hobby Lobby last week and picked up a simple veil for $9.99 (plus it was half off because of their sale so I spent $5!) It is ribbon edged, but two layers, So I sat down with my scissors and very carefully cut off the top layer. I love the simplicity of it now.

Now for the flower, I had every intention to make a flower. I figured I would spend about $5 on it, no biggie right?
Well, I was walking around Family Dollar Friday night picking up a few things and I saw these flower barrettes in the corner. Sure enough, they had a white one, it was huge and on a pony tail holder but it was also on clearance for 75 cents! So I brought that bad boy home, cut off the two bottom layers, hot glued it to an alligator hair clip and Ta- Da! My 75 cent hair flower.
 So far, I've spent a grand total of $165.75 on this wedding and I have my veil, hair flower, jewelry, flower girl baskets, card box, serving set, garters, aisle runner, photo mat, and cake topper... and my $100 deposit on my venue. Let's see what I can come up with next weekend shall we?

The flower girl necklaces are pink and blue glass pearls from the package that I picked up. I figured why not? They match the wedding colors and it saved me from buying more pearls. I had the girls try them on tonight and they look great! The girls are soooo excited to get to wear them in the wedding.

My necklace was a little harder. I used ALL of the white pearls that were in the wal-mart package, as well as a few (maybe 15?) small pearls I had in my craft box. I tied three strings to a jump hook on one end and just starting adding beads. The bottom string is about 7 inches long, the second is 6 inches long and the third is 5.5 inches long. For the bottom I used the largest beads, for the second I used large beads on the outsides (10 on each side) and then used the next size down, and on the third I used 1 large pearl, 7 medium sized on each side and then the tiny ones. I'm really happy with the end it turned out. It took me ALL day to make it the way I wanted it, but I'm pleased. I also added an extender to that one so I can adjust the length.

When I went to David's Bridal and found THE PERFECT DRESS the lovely sales lady had me also put on a veil. I pushed back, I don't need a veil, I'm not wearing one... "But it's your wedding day and it's the only day you'll get to wear one and you'll feel like a bride and blah blah blah". So, I gave in. She brought me a really pretty simple, ribbon edged one layer veil and this pretty flower for my hair. She put them on me and I feel in love instantly. I knew I had to have them at that point.
So, that night I came home and looked online... well the veil was $150 and the flower was $90! $90 #?*!ing dollars for a FLOWER. No way, no how, not gonna happen.
Well, I hit up Hobby Lobby last week and picked up a simple veil for $9.99 (plus it was half off because of their sale so I spent $5!) It is ribbon edged, but two layers, So I sat down with my scissors and very carefully cut off the top layer. I love the simplicity of it now.

Now for the flower, I had every intention to make a flower. I figured I would spend about $5 on it, no biggie right?
Well, I was walking around Family Dollar Friday night picking up a few things and I saw these flower barrettes in the corner. Sure enough, they had a white one, it was huge and on a pony tail holder but it was also on clearance for 75 cents! So I brought that bad boy home, cut off the two bottom layers, hot glued it to an alligator hair clip and Ta- Da! My 75 cent hair flower.

Wednesday, October 13, 2010
(kinda) DIY #3 and #4: Serving Set and Flower Girl Buckets!
Hobby Lobby had a fanstastic 50% off Bridal Blowout Sale last week, and they are continuing it this week too! But, don't worry if you miss out, just keep an eye on their ad's or use one of their 40% coupons for the things you need!
I took full advantage of it and picked up a few things for real real cheap. Included in that was my cake serving set! $5!

I used some more of my ribbons from my garters and made a pile of bows and had some run with my glue gun attaching them to the serving set and the buckets below. :)

The buckets were also picked up on my Hobby Lobby shopping trip! These are considered stationary, so look in the card area, mine were on a display in the middle of an aisle at my store. $1.49 a piece. Oh yeah! :) They are just little metal buckets and I added some bows to the sides in Navy Blue and Hot Pink. Still using that garter ribbon I bought!
They will be just perfect for my little flower girls.
I also went dress shopping last weekend with my maid of honor and the "paparazzi" as I called one of my other best friends. We were at David's Bridal for a grand total of 30 minutes. I tried on two dresses and fell in love with the second. My MOH did the same, we tried two and the second was perfect! I'm not going to post pics of the dress I picked because I don't want to take a chance of my G.I. seeing it before then, but here's the one we found her:

Ok, that's all for now! More DIY'ing coming along this weekend. Going to try to make my MOH and Flower Girl necklaces.
Friday, October 1, 2010
DIY #2 Store Bought Embellished Wedding Garters

Garters were one of my first DIY ideas and I spent a lot of time searching online for information on how to make them. I was set until I hit the craft store. While walking around looking for cheap fabric, lace, elastic, and decorations I had at least $20 worth of stuff in my cart and I didn't know how they would turn out!
I put everything away and walked away from the whole idea, thinking I would just be better off doing store bought.
Later on, I was roaming around Dollar Tree and found plain white garters. They had kind of goofy looking white bows on them, which I figured would be easy to remove (they were just hot glued on!) and gave me a good foundation to work with. ($2 total!)
I headed down to good ole Wal-Mart and picked up two rolls of satin ribbon ($1.97 each!) in hot pink and navy blue and went back to Hobby Lobby to get some charms to add. The charms were 50% off so I ended up spending $2.24 total on those.
I sat down today and made four little bows with my ribbon, sewed each set together and then added the charms to the front. When they were complete I hot glued them onto my cheapy garters and VIOLA! Personalized fun garters for $8.18! Plus I have left over ribbon to use on future projects.
The picture may be a little hard to see, but the charm on the toss garter says LOVE and the one on the keep garter says I DO. I'm so happy with the way they turned out. Can't wait to start on my next project! My card box! Stay tuned. :)
Thursday, September 30, 2010
DIY Cake Topper

Our colors are going to be Navy Blue and Hot Pink and I have been in love with the thought of using an initial for the cake topper since I got started in all of this wedding hoopla, but I was definitely not in love with some of the price tags I've seen! I refuse to spend $75 for more on something that will be stuck in the top of our cake. Heck, my dress budget is only $150!
So, I decided that I'm going to have what I want without spending tons of money.
I walked around Hobby Lobby last Friday and there were initial items everywhere! The one that I bought was just a plain black metal R with a ribbon hanging from the top for $2.99.
I got some bedazzling jewels. They were flat on the back, and pretty small. I don't remember the size, but there were 144 pieces in each bag, so they were rather tiny. I bought four bags. (and I was sweating it at the end afraid that I wouldn't have enough. I did end up with leftovers though.) ($1.99 each bag)
Then I sat down on my comfy couch and some Elmers glue and added the jewels to the R. It took about 2 hours to do it, but I'm really happy with the way it ended up.
When it was dry I painted two wooden craft sticks black where it would attach to the letter, and then a little bit down so they wouldn't be exposed if it sticks out of the cake a little and hot glued them to the back of the R.
The picture doesn't really do it justice. It's so pretty and sparkly in the light and I can't wait to see it on top of my cake/cupcake tower! Total cost? $10.86
Thursday, August 26, 2010
Operation Birthday Cakes!
I just happened to be looking around on mypoints.com at different vendors and stumbled across http://www.bakemeawish.com/. They actually have a section called "Operation Birthday Cakes" for sending a cake to an APO or an FPO.
What?! How did I not know about this last month? Darn. My soldiers birthday was earlier month and I sent him a package... (more about that later) but I wish I had know about Bake Me A Wish.They send them out twice a week to military addresses and they keep them refrigerated so they can arrive safe and sweet.
I clicked on the icon to read soldiers responses and I found myself getting all weepy, so I had to stop. Quickly.
What a great way to get a birthday cake to your favorite soldier when he/she can't be home for his/her birthday! I'm touched when I see things like this and I thank God that there is so much out there offered for our men and women that fight for our freedom.
Has anyone tried this?
Man, now I want to send him one just for the heck of it. :)
Sunday, July 4, 2010
Customized T-Shirt
Let me just take a moment to say that I love CustomizedGirl.com! I've seen ad's for them in magazines before, but I just recently ordered from them. I was VERY pleased.
Their website enables you to design your own shirt using their graphics or by uploading your own design. They have a few military options, and since I hadn't made anything that I loved, I played with what they had.
Plus, if you search online you can find coupon codes and get a great price! Just google coupon codes customized girl and you will get a good amount of sites that offer codes. Check out places like retailmenot.com and couponcabin.com, those are definetely my favorites.
I got a super cute shirt for cheap! And I loved my wearing "Property of a U.S. Soldier" shirt out on the town. In fact, instead of being hit on by skeezy guys, I got a lot of "thank you's" for both me and him. That always feels amazing. :)
They offer so many options, t-shirts, hoodies, panties, kid stuff, and so much more. Go check them out!
Saturday, June 19, 2010
The Sack Lunches
I read this on a website I frequent today and thought I'd pass it on. WOW. This is definetely correct. Soldiers pay the ultimate price for us, it's amazing to hear about someone doing something for them.
Author: Unknown
The Sack Lunches
I put my carry-on in the luggage compartment and sat down in my assigned seat. It was going to be a long flight. 'I'm glad I have a good book to read. Perhaps I will get a short nap, I thought. Just before take-off, a line of soldiers came down the aisle and filled all the vacant seats, totally surrounding me. I decided to start a conversation.
'Where are you headed?' I asked the soldier seated nearest to me.
'Petawawa. We'll be there for two weeks for special training, and then we're
being deployed to Afghanistan.' After flying for about an hour, an announcement was made that sack lunches were available for five dollars. It would be several hours before we reached the east, and I quickly decided a lunch would help pass the time...
As I reached for my wallet, I overheard a soldier ask his buddy if he planned to buy lunch. 'No, that seems like a lot of money for just a sack lunch.
Probably wouldn't be worth five bucks. I'll wait till we get to base.' His friend agreed.
I looked around at the other soldiers. None were buying lunch. I walked to the back of the plane and handed the flight attendant a fifty dollar bill. 'Take a lunch to all those soldiers.' She grabbed my arms and squeezed tightly. Her eyes wet with tears, she thanked me. 'My son was a soldier in Iraq ; it's almost like you are doing it for him.'
Picking up ten sacks, she headed up the aisle to where the soldiers were seated. She stopped at my seat and asked, 'Which do you like best - beef or chicken?' 'Chicken,' I replied, wondering why she asked. She turned and went to the front of plane, returning a minute later with a dinner plate from first class. 'This is your thanks..'
After we finished eating, I went again to the back of the plane, heading for the rest room. A man stopped me. 'I saw what you did.. I want to be part of it. Here, take this.' He handed me twenty-five dollars.
Soon after I returned to my seat, I saw the Flight Captain coming down the aisle, looking at the aisle numbers as he walked, I hoped he was not looking for me, but noticed he was looking at the numbers only on my side of the plane. When he got to my row he stopped, smiled, held out his hand and said, 'I want to shake your hand.' Quickly unfastening my seatbelt I stood and took the Captain's hand. With a booming voice he said, 'I was a soldier and I was a military pilot. Once, someone bought me a lunch. It was an act of kindness I never forgot.' I was embarrassed when applause was heard from all of the passengers.
Later I walked to the front of the plane so I could stretch my legs. A man who was seated about six rows in front of me reached out his hand, wanting to shake mine. He left another twenty-five dollars in my palm.
When we landed I gathered my belongings and started to deplane. Waiting just inside the airplane door was a man who stopped me, put something in my shirt pocket, turned, and walked away without saying a word. Another twenty-five dollars!
Upon entering the terminal, I saw the soldiers gathering for their trip to the base. I walked over to them and handed them seventy-five dollars. 'It will take you some time to reach the base... It will be about time for a sandwich. God Bless You.'
Ten young men left that flight feeling the love and respect of their fellow travelers.
As I walked briskly to my car, I whispered a prayer for their safe return.
These soldiers were giving their all for our country. I could only give them a couple of meals. It seemed so little...
A veteran is someone who, at one point in his life, wrote a blank check made payable to 'The United States of America 'for an amount of up to and including my life.'
That is Honor, and there are way too many people in this country who no longer understand it.
Friday, June 4, 2010
Bad Ass Chicks
Now that the inital sadness of my GI going back to his base is starting to tone down a little bit.. I've come to realize something incredible.
I am a proud member of the "Bad Ass Chick" Club.
A bad ass chick isn't a girl that rides a motorcycle, picks fights and covers herself in tattoo's.
A truely bad ass chick does what we do every day. A bad ass chick stands up for what she believes in, takes care of herself and puts her life in the hands of fate.
A bad ass chick knows what it's like to have to fall asleep every night on her own. A bad ass chick knows how to make decisions on her own and make her own plans, whether it's what to make for dinner or where to live... because she knows she has to do it on her own, and she knows that she will make the right choices.
A bad ass chick sets goals and follows her dreams instead of standing back and wishing for them to come true. She knows what she wants and she has the ambition to chase those dreams at full force.
A bad ass chick knows the word "deployment" and knows that this one word can shake her world apart. She may have to go weeks or months without a word from the man she loves, but she still gets out of bed everyday and carries on, because she knows laying in bed all day crying and waiting won't make time go by any faster.
A bad ass chick will have to spend birthdays, anniversaries, and Christmas with half of her heart missing. But, she doesn't use this as an excuse to not celebrate her life and what she has.
A bad ass chick knows what it's like to need a hug and a kiss when he's too far away to touch. She also knows that missing the feel of his skin for months on end is worth her next first kiss when he comes home. So, she remains true to her soldier, hugs her pillow and waits for it to be her turn.
A bad ass chick does just know the true meaning of love. She knows the deepest, strongest love known to man, a love most can not describe.
A bad ass chick can hear "I love you" from her soldier and that's all it takes to remind her no matter how hard it is to miss him, at least she has someone incredible to miss.
A bad ass chick spends plenty of time crying and praying and wishing on a star for him to come home soon. But, the pride she has in her military man for serving our country outweighs all the pain and she wouldn't change it for a thing.
Wednesday, June 2, 2010
The orgin of Taps
Got this in an email for one of my favorite Army Wives today and thought it was very interesting! Just wanted to pass it along cuz you might like it too!
We in the United States have all heard the haunting song, 'Taps...' It's the song that gives us the lump in our throats and usually tears in our eyes.
But, do you know the story behind the song? If not, I think you will be interested to find out about its humble beginnings.
Reportedly, it all began in 1862 during the Civil War, when Union Army Captain Robert Elli was with his men near Harrison's Landing in Virginia . The Confederate Army was on the other side of the narrow strip of land.
During the night, Captain Elli heard the moans of a soldier who lay severely wounded on the field. Not knowing if it was a Union or Confederate soldier, the Captain decided to risk his life and bring the stricken man back for medical attention. Crawling on his stomach through the gunfire, the Captain reached the stricken soldier and began pulling him toward his encampment..
When the Captain finally reached his own lines, he discovered it was actually a Confederate soldier, but the soldier was dead.
The Captain lit a lantern and suddenly caught his breath and went numb with shock. In the dim light, he saw the face of the soldier. It was his own son. The boy had been studying music in the South when the war broke out.. Without telling his father, the boy enlisted in the Confederate Army.
The following morning, heartbroken, the father asked permission of his superiors to give his son a full military burial, despite his enemy status. His request was only partially granted.
The Captain had asked if he could have a group of Army band members play a funeral dirge for his son at the funeral.
The request was turned down since the soldier was a Confederate.
But, out of respect for the father, they did say they could give him only one musician.
The Captain chose a bugler. He asked the bugler to play a series of musical notes he had found on a piece of paper in the pocket of the dead youth's uniform.
This wish was granted.
The haunting melody, we now know as 'Taps' used at military funerals was born.
The words are:
Day is done.
Gone the sun.
From the lakes
From the hills.
From the sky.
All is well..
Safely rest.
God is nigh.
Fading light.
Dims the sight.
And a star.
Gems the sky.
Gleaming bright.
From afar.
Drawing nigh.
Falls the night.
Thanks and praise.
For our days.
Neath the sun
Neath the stars.
Neath the sky
As we go..
This we know.
God is nigh
Subscribe to:
Posts (Atom)