Sunday, December 2, 2012

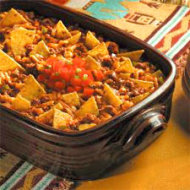
Cynthia's Chili


It seems like I only ever plan to make chili when it is unseasonably warm outside. Since it was 71 degrees on December 1st I made chili last night.

  My friend Cynthia brought this to one of our work potlucks a year or so ago and I could have ate it all day long. Ok, I pretty much did. Anyway... here is the recipe. Make it. Eat it. Love it.

Cynthia's Chili
1 lb ground beef
1 pkg chili seasoning
1can Rotel (Chili fixins)
1 can chili beans
1 can red beans, drained and rinsed
1 can dark red kidney beans, drained and rinsed

Brown hamburger and drain. Stir in seasoning, Rotel and beans. Heat until boiling. Eat.

Last night we had Frito Chili Pie. Today I had chili with tortilla chips because that bag of Fritos was long gone. :)

Sunday, November 11, 2012

Hallway photo shelves and office area- Living room part two!

Hey everyone! I know I haven't posted in a while, but things are busy around here! I've signed up to do my FIRST EVER craft show in December, so pretty much every spare second I have is being spent working on products for the show. Cross your fingers for me... hopefully it will go well!

In the meantime we have managed to finish up a couple of fun projects for the living room area. I found this awesome project on Pinterest via this blog: http://ana-white.com/2010/10/plans/ten-dollar-ledges

The hubby just followed her AMAZING tutorial and I am soooo happy!

 
AND we started working on the office area.
 
(had to blotch out all the personal info on our papers.. lol )


I had a poster frame and no where to hang the poster itself so I repurposed it into a dry erase calendar. All I did was draw out the calendar grid on scrapbook paper and put it inside the frame with some decorative scrapbook paper. We used a dry erase maker to number the days of the month and to add on all of our to do's. Then, I modge-podged scrapbook paper onto clipboards and now we each have one for our random piles of paper that love to build up around the house.
 
Pssst... do you love the salmon wall next to the printer? Our craft room/office used to be the kitchen in this house before they remodeled in the 80's. We took down the peach wall paneling and discovered salmon walls! Under the salmon used to be pea green. Sexy.....
 
This weekend we painted over the salmon with Latte by Sherwin Williams. I can't wait to get some more done and show it off! :)
 
'Til then! <3 p="p"> 

Saturday, October 20, 2012

Living Room Revamp Part 1

When we started working on the house, the husband and I came to an agreement. We would only paint every other weekend so we don't wear ourselves out. See how long that lasted?
 
Not long at all. But, the kids were on fall break this week so I took a three day weekend. And I couldn't stand to look at my living room any longer!
 
Over the past few weeks DH has been busy! He removed the drop ceiling in the living room and ripped down all of the lovely 80's wall paneling. The previous owners painted ALL the paneling peach. Lovely huh?
 
Here is the living room the weekend we moved in. Even our stuff couldn't camoflauge the peach!
 
 
We didn't finish EVERYTHING this weekend, but we did get quite a bit knocked out. We painted the walls with Sherwin Williams Svelte Sage (this may be my favorite sage color EVER). Then we just got to work on the decor.
 
We used an old barnwood frame I had from the apartment for the R.
 
I covered the backing of the frame in burlap. In order to hold the burlap down to the cardboard I just used some adhesive spray glue. Then, I hot glued the R to the top of the burlap. Easy Peasy.
 
 
The birds are stickers that we made! We used my Cricut and my Home Decor cartridge to cut them out with red vinyl and the hubby stuck them to the wall for me!
 
I can't wait to get some more done, but we've already made a lot of progress!
 
More to come! :)


Saturday, October 13, 2012

Master Bedroom Redo!

It's been another busy weekend in this house! This time we attacked our bedroom. It doesn't even feel like the same room.

Here is the before we moved in photo:


Don't act like you aren't jealous of those sexy lace curtains. Too late, I've already donated them to the thrift store... sorry guys.
Anyway, here are the after photos!

Welcome to our room! We bedding is from Kirklands.com for $99.00! (I am totally in love and can't wait to sleep in it tonight!)

The X's and O's are 9.5 inch letters from Hobby Lobby that I painted black and the hubby hung up with double sided poster strips.

The paint color is Samovar Silver from Sherwin Williams. As far as I'm concerned it's the PERFECT silver/blue color.

Also, have I ever mentioned that my husband BUILT me this bed? Yep, ONE DAY while he was home on leave when I was at work. Amazing.


Here is the dresser we repainted black last weekend.

The branches on the wall are painted on. I cut the branches out with my Cricut. (Home Decor Cartridge) Then, I used my projector to project them on the wall. After they were in place I traced them with chalk and spent practically half of my life painting them by hand.

Ok, just kidding. It was only a couple of hours. And totally worth it.

We made the "God gave me you" sticker with my Cricut and some vinyl.


All in all, I'm very happy with our progress! The living room is next! :)

Saturday, September 29, 2012

Girl Race Car Bedroom

First off, guess what is impossible to find on Pinterest? Girl Race Car Bedrooms..... and they aren't many race car room ideas anyway. So, this took a whole lot of planning on our part!
Here is Fish's room when it was on the MLS listing.


It amazes me that this is even the same room. Also, take a moment to notice the huge desk. This is already a pretty small room. Add a huge L Shaped desk and I almost felt bad for putting her in this bedroom.
You should have seen us move that thing. It was GLUED together. And I have zero upper arm strength so helping my hubby move the desk to our Office/Craft Room was like the most.fun.ever.
Anyway.... back to the bedroom!
Can you believe my little girl is telling me she wants to be a race car driver? When she decided she wanted a race car room my husband ran with it.
He found a template for a race car bed at WoodCraft.com for $15. Then, he spent two weeks putting it together.


Just another reason why I love that guy. :)

It's hard to believe that the pile of wood and hardware he started out with ended up as this....


Black comforter, pink sheets and pink curtains are from Walmart. I made the checkered curtain with fabric from Hobby Lobby.

The flags that are being held by the monkey were super easy to make. I cut up different bandannas that I picked up from Hobby Lobby and hot glued then onto wood dowels.

The stars on the wall were unfinished wood stars from Hobby Lobby.

I made the bow holder by painting a plaque and then adding ribbon and a race car... from Hobby Lobby...


Are you noticing a trend?

No, Hobby Lobby doesn't pay me to blog. And I don't work for them. I wish I could but my husband says I would spend my paycheck at work before I could even get it home. He's probably right.

I hate it when he's right.


While we are on the subject of Hobby Lobby they were having a 50% off sale on metal men's decor this week. The stop sign, Nascar sign the stoplight were a total of $15.00. Score!


Ohhh See that car on the race track?

Here are some more:


I attached velcro to the bottom of the cars and also to the painted on race track. I added hot glue to the velcro dots on the wall...

and I will just have to see if they are still on the wall tomorrow! They seem to be holding really well though.

Of course every good race needs to have a stadium full of fans!

We used 4 inch, 6 inch and 8 each shelves and attached them to the wall with brackets.


The wrestlers are quite rowdy though... so they had to sit on the other side. Can't have them mingling with the Barbies, babies and stuffed animals. That would get K-razy.


I mean, I was intimidated putting them on the shelf.

All in all I LOVE how the room turned out and so does Fish. Hopefully this will continue for at least 5 years!

Sunday, September 16, 2012

Rae's Room Revealed!


After a very long, yet very productive weekend, the hubby and I got Rae's room painted and decorated!

Here is the before picture from the MLS listing:


And here is the after from about the same angle!


We painted 3 of the 4 walls gray. The color is Gray Granite from Colorplace (Wal-Mart)

I made the curtains, memo board and the pillow with fabric I picked up at a yard sale last weekend.

I made the coat rack by modge podging zebra paper to an unfinished wooden rack from Hobby Lobby.


I made the bow holder with a plaque from Hobby Lobby also! I modge podged zebra paper onto it and cut out the fleur de lis and letters with my Cricut! Then I just added ribbon to the bottom to hold the bows and ribbon to the top for hanging!

While at yard sales I also found this wood shelf for $2! We spray painted it black and now Rae has a place for all of her nail polish and head bands.


This is my one big accomplishment for the day! I found a projector at the thrift store a couple of months ago and knew I would need it for some projects in the new house. I borrowed a Cricut Cartridge called Rock Princess from my mom. I cut out the skull and cross bones shape onto paper and then projected it onto the wall.

Once we had it positioned where we wanted it, the hubby and I traced the outline with chalk onto the wall. I painted this wall pink on Friday night (the color is "Love St. Valentine's Day", by Colorplace at Walmart... who comes up with these colors, anyway?) so it was dry and ready to go today!

I just painted in the chalk outline with gray paint and let it dry. I painted two coats and it covered the crazy hot pink pretty well!

Rae came home this evening and she approves... thank goodness, because she's living with it for a while!

I found a lot of my inspiration from Pinterest... I'm not sure how I ever lived without that site. Check it out and follow my boards... I love followers! 


Friday, September 14, 2012

Sneak peek of rae's room!

I started painting rae's room tonight! Here is a sneak peek!

More pics to come after this weekend!


Sunday, September 9, 2012

Easy peasy corkboard revamp

There is nothing like a quick craft project while watching Larry the Cable Guy to help you wrap up a Sunday night! I'm gearing up to start working on Rae's bedroom makeover next weekend. I've already gatheres her up quite a few wall hangings but every girl needs somewhere to hang up her randomness, right?
This weekend we went to many many garage sales and I picked up this super cute leopard fabric. Now we were planning a zebra and hot pink room but I think by adding a few accesories the leopard is going to work out quite well!
What you need:
A corkboard - I got mine from walmart for $4 on clearance
Fabric- amount depends on the size of the corkboard. I used probably half a yard.
Ribbon to match your fabric. I ended up using the entire roll.
Hot glue gun and glue sticks.
Lay your fabric on the floor under your corkboard and cut the edges just so they are a couple of inches bigger than the board on each side.
To attach the fabric to the back of the board I started with folding each corner in around the back of the board and gluing into place. Then I folded all the sides around to the back of the board and glues them into place. Be sure to pull tightly!
Next I used the black ribbon attached one side to the back of the board. I criss crossed each piece over the front of the board before hot gluing into place on the back. I did this several times until I liked how it looked basically, so just play around with it. I used quilting tacks to secure each X into place.
On the back I attached a loop of ribbon with hot glue to hang it on the wall.
The whole project took less than 30 minutes and i love the results!

Monday, July 16, 2012

Fried Okra


Leave it to crazy Midwestern people to find the need to fry EVERYTHING.

Believe me, there is not much better than fried okra and ranch dressing.

We picked up a package of okra and dredged each piece in a mixture of egg and milk and then coated it in flour with some seasoning salt. We fried it in a skillet with vegetable oil until the batter was browned.

Quick, easy and super delicious!

Blt pasta salad

BLT salad I made for a 4th of July bbq. If you ever need enough salad to feed 200 try this: http://www.abirdandabean.com/2011/06/blt-pasta-salad.html (or cut the recipe down A LOT) Whichever.

Note: I used 2 regular heads of  lettuce.

Remote Control Tray

I made this tray pretty quickly before the hubby got home. It's meant to be a place to hold our millions of remote controls. Now we just have to remember to put our remotes on it!

It was super easy to make! I painted an unfinished tray that I purchased at Hobby Lobby black and then decoupaged on a piece of red scrapbook paper and a fleur de lis with Modge Podge that I cut out with my Cricut.

All in all it took no time. I think I'll make one for each of the girls once they have their own rooms to put them in! :)

Sunday, June 17, 2012

Button Hair Pins

In another attempt to clean my up craft area I made some hair pins one day last week. These were super easy and the possibilities are endless.


I just took a button, slid it onto the bobby pin and then hot glued into place so they don't slide around. Does it really get any easier than that?

Cheap and Easy 4th of July wreath


Lately I have realized that my craft stuff is pretty much taking over my bedroom. Needless to say, it's probably time to get a grasp on the situation.

Last week I decided to make a wreath for 4th of July without spending any money. I love how it turned out!

I used a piece of foam pipe insulation that I had sitting around and formed a circle. I duct taped the ends together. (Yes, that's kind of redneck... don't judge me!)

Next, I cut strips of blue, red and white felt and glued them into place to look like a flag. I just hot glued the ends in place.

Then, I glued on buttons to look like stars.

I got this fabulous idea from Pinterest. (where else, really?)

Follow my craft board on Pinterest here:

Sunday, May 13, 2012

Wedding Sign

My sister in law is getting married this summer. She told me that needed something to cover a random window at the wedding venue so we decided that I would make her a sign to cover it. She got her inspiration from here: 


 and Pinterest. 
Using a cardboard display board from Hobby Lobby, some cardstock and my Cricut.... THIS massive baby was born:


Hopefully, she will LOVE IT!


Weight Watchers Taco Casserole


Oh my goodness. I've never been one to look for Weight Watchers Recipes... honestly this is the first I have ever found and tried. Thanks again Pinterest!)

I did change things up just a little to make it easier:

What you need: 
1 large can of cooked chicken
1 TBSP Onion powder
1/2 cup chopped bell pepper
1 pkg taco seasoning mix
8 oz taco sauce
1 cup fat free sour cream
1 cup fat free cottage cheese
1 cup low fat tortilla chips
1 cup low fat shredded cheddar cheese
3/4 cup salsa

Preheat oven to 400.

Drain chicken. Add chicken, onion powder,  bell pepper and taco seasoning mix to the skillet. Cook until peppers are tender and chicken shreds easily. Shred the chicken in the skillet. Add taco seasoning and stir together. Set aside. 

Combine the sour cream and cottage cheese. Set aside.

Place half of the broken chips in the bottom of a casserole dish. 

Add meat mixture to cover chips.

Add sour cream mixture to cover meat mixture.

Cover with the other half of the broken chips and shredded cheese.

Bake 30 minutes or until cheese is melted.

Top with salsa.

This was soooo good! Even my picky girls ate it up!

Monday, May 7, 2012

Diet Dr. Pepper Cupcakes

Ummm yeah... you read that right! Diet Dr. Pepper Cupcakes were all the rage on Thenest.com back in the day. These are so moist, go yummy and so easy to make. Also, they are low fat because they do not have eggs or oil in them. The girls and I made some last week that I took to work to share.

Here's how to do it!


Put the box of cake mix in a bowl.


Pour in a can of diet soda


Mix and then lick the mixer AFTER


Bake as directed on box


Find the other kid to help decorate her six cupcakes. (after stealing 12 to smuggle to work)

And enjoy!

Monday, April 30, 2012

Easy Chicken Tacos

Ok, so you guys already know that I love Pinterest... probably more than any normal person should. But, I can't help it... especially when it helps me get out of food ruts.


I found a recipe for 3 ingredient crockpot chicken tacos from mychocolatetherapy.blogspot.com and I knew I would have to try them.

Since I decided to make these on weeknight, I didn't really have the option to use my crockpot. So I just tweaked things a little. What I ended up with was a super fast weeknight dinner and two little girls telling me that these are the BEST TACOS IN THE WORLD... using canned chicken.

What you need:

1 large can of cooked chicken breast
2 Tbsp. of taco seasoning.
1/2 cup salsa

Drain can of chicken and put in a skillet over low heat. Sprinkle with taco seasoning and stir to coat. Cook until warm. Use spatula to break up and shred the chicken. Stir in salsa, continue to cook over low heat just to warm up the mixture.

Serve in tortillas with lettuce, tomato, guacamole, sour cream etc.

Easy. Delicious and oh so cheap. Enjoy!

Sunday, February 26, 2012

St. Patrick's Day Wreath


I threw this wreath together tonight in almost no time. :) Here's how you can do it too!


What you need:
Wide Brown ribbon
Thinner Green ribbon
Foam shamrocks (you could make them yourself, but I bought these at Dollar Tree. $1 for a package)
Hot Glue
Black marker
wreath form

1. Wrap the form first with the brown ribbon.
2. Overlap the brown ribbon with the thinner green ribbon.
3. Hot glue 5 light green shamrocks together.
4. Use the sharpie to write "L-U-C-K-Y"
5. Hot glue the last shamrock in place
6. Use the brown ribbon to make a hanger at the top of the wreath.

DONE!


Saturday, February 25, 2012

Lasagna Soup


I love great Pinterest finds.


This lasagna soup is amazing. Love it soooo much!

You should probably try it right now. You won't be disappointed.

Monday, February 6, 2012

Project 365: Day 161 Oreo Cheesecake Cookies

Oh Pinterest why do you tempt me so much? Especially when I need to think about working out, not eating cookies. SIGH.

I made this cookies last night during the Super Bowl from this site:
thisistolove.blogspot.com/2011/08/oreo-cheesecake-cookies.html

and today... it has disappeared?!

I did manage to find it online here also: http://tastykitchen.com/blog/2010/11/step-by-step-oreo-cheesecake-cookies/

(looks like a pretty fabulous blog!)

Here's what you need:
3 oz. cream cheese (softened)
1/2 cup unsalted butter (softened)
1 cup sugar
1 cup flour
1 tsp vanilla extract
1 cup oreo crumbs


Preheat oven to 375 degrees and line two cookie sheets with parchment paper.

In a large bowl, cream together the butter and cream cheese until web combined.

Add the sugar and vanilla and mix until well combined. Add the flour and mix on low until flour is incorporated.

Fold the oreo crumbs into the cookie batter.

Using a cookie scoop, scoop and arrange the cookies on the cookie sheet two inches apart.

Bake for 12-15 minutes or until the edges start to turn golden brown and the tops start to puff slightly.

Cool on the pan for two minutes before transfering to a wire rack to finsh cooling.

This made about 2 dozen cookies.

Thursday, February 2, 2012

Junk Food Bouquet


Doing all of your gift giving through the mail can get rather difficult over time. I feel like I never know what to send him and I am constantly out of ideas. Not to mention the fact that buying a non-mushy Valentine's gift for man is not the easiest thing in the world.
Tonight I sat down for about 30 minutes while catching up on Grey's Anatomy to make this manly bouquet to put in the mail for the husband. I hope he likes it!

Here is how you can make your own!

What you will need:
Junk Food:
(I used small bags of chips, sunflower seeds, peanuts, beef jerky, and different types of candy bars.)
Wood Dowels
A foam floral block
A plastic pot


1. Hot glue the food packages to the dowels. (I broke some of the dowels make them at various heights. The pieces in front are on shorter sticks, etc.)

2. Arrange the dowels in the foam block. Use hot glue to secure the sticks in place.

3. Use hot glue to secure the foam block into the pot.

Ta-da! Quick, easy and fun!


Linked up at tatortotsandjello!

Monday, January 16, 2012

Project 365: Day 139 Caramel Apple Cookies

What do you know... another Pinterest score! I found this recipe for Caramel Apple Cookies a while back and have been dying to try it out. I made them last night and I have decided these are the best cookies in the world. 

I took them to work today and they were eaten up! Luckily, I saved a plateful of cookies for me and the girls at home. 

I got the recipe from here: http://sixsistersstuff.blogspot.com/2011/11/apple-cider-caramel-cookies-recipe.html and just tweaked it a little. I can't wait to check out their blog a little bit more!

What you'll need:
1 cup unsalted butter, nearly melted


1 cup granulated sugar


1/2 teaspoon salt


1 (7.4 ounce) box Alpine Spiced Apple Cider Instant Original Drink Mix *Not sugar free*


2 eggs


1 teaspoon vanilla extract


1 teaspoon baking soda


1/2 teaspoon baking powder


3 cups all-purpose flour


1 bag Kraft Premium Unwrapped Caramel bits


1. Preheat oven to 350 degrees. Line cookie sheets with parchment paper.

2. In a stand mixer, cream together butter, sugar, salt, and all 10 packets of apple cider mix until smooth and fluffy. Beat in eggs and vanilla extract, then mix in the baking soda and baking powder. Add the flour and mix until just combined. Add the caramel bits. (I didn't use an exact measurment. It was most of the bag, I just added until there were caramel bits throughout.)


3. With a cookie scoop, scoop the dough scrapping off the excess as you go up the bowl and  place the cookies two inches apart on the sheets.


4. Bake 12 to 14 minutes or until golden brown around the edges. After baking, carefully slide the parchment with the cookies onto the counter. Let cool until they are no longer soft but still slightly warm. Twist gently to remove, and cool the rest of the way upside down on the parchment or on a cooling rack.

The original blogger said if you have an issue removing cookies from the paper place the cookie sheet in the freezer for a few minutes and then you can twist them off. (worked like a charm!)

Sunday, January 15, 2012

Crockpot Bufflao Chicken

This is another recipe that I found on Pinterest and have been DYING TO try. I don't know how I managed to NOT take a picture but luckily the original blogger has a bunch of pictures.

What you'll need:
2-3 pieces of frozen Chicken Breast
1 bottle of Frank's Wings Buffalo Sauce
1 pkg. of Ranch dip


Put chicken breast in the crockpot. Pour entire bottle of buffalo sauce on top and then pour in the package of Ranch Dip.

Cook on low for 6-7 hours.

Remove chicken from crockpot, shred and return to crockpot. Add two tablespoons of butter. Cook for another hour on low so that the chicken can soak up the juices.

We used this for buffalo chicken sandwiches with mozzarella cheese and ranch dressing. (I think Blue Cheese would have been awesome also.) YUM!

Saturday, January 14, 2012

Pumpkin Spice Cupcakes with Whipped Cream Frosting

I have been finding so many amazing recipes one Pinterest here lately. Mostly, I am finding a ton of sweets. The problem is, we don't eat a lot of sweets in this house. More often then not, sweets are thrown away before we can eat them all. Luckily, I have hungry coworkers.

I made these Pumpkin Spice Cupcakes for a birthday last Sunday. They were AMAZING.

I got the original reciepe here for Pumpkin Spice Latte cupcakes, but since I couldn't come up with espresso powder, so we did without.  I also used pumpkin spice instead of nutmeg and cloves. No one complained.

What you'll need:

2 2/3 cups all-purpose flour
2 tsp. baking soda
2 tsp. baking powder
1 tsp. ground cinnamon
1 tsp. pumpkin spice
1 tsp. salt
1 (15 oz.) can pumpkin puree
1 cup sugar
1 cup brown sugar
1 cup canola or vegetable oil

4 large eggs
For the topping:
2¼ cups heavy cream, chilled
¼ cup confectioners' sugar
Ground cinnamon
Caramel sauce

Preheat the oven to 350 degrees. Line cupcake pans with paper liners. In a medium bowl, combine the flour, espresso powder, baking soda, baking powder, cinnamon, pumpkin spice and salt. Stir together and set aside. In the bowl of an electric mixer, blend together the pumpkin, granulated sugar, brown sugar and oil. Add the eggs one at a time, beating well after each addition. With the mixture on low speed, add the flour mixture in two additions, mixing just until incorporated.

Fill the cupcake liners about three-quarters full. Bake until the cupcakes are golden and a toothpick inserted into the center comes out clean, 18-20 minutes. Transfer the pans to a wire rack and let cool for 10 minutes, then remove the cupcakes from the pans. Let cool completely.
To make the frosting, place the heavy cream in the bowl of an electric mixer fitted with the whisk attachment. Whip on medium-low speed at first, gradually increasing to high speed. Blend in the confectioners’ sugar gradually. Whip until stiff peaks form, being careful not to over-beat. Use a pastry bag fitted with a decorative tip to frost the cooled cupcakes. Sprinkle with ground cinnamon and drizzle with caramel sauce. Store in an airtight container and refrigerate.


Go try them now!