Sunday, October 27, 2013

Spinach Tortellini Soup


I think there are very few foods that I love more than Spinach. So, anytime I land on a Spinach recipe I just have to try it out. So, this was a no brainer when I saw it on Pinterest. 


This recipe wasn’t linked to any particular website, it was just a delicious looking picture and the recipe on the pin. 

I tried it out and wouldn’t change a thing! In fact, I ate this practically every day last week for lunch.  ;)

Ingredients:
1 bag of frozen tortellini
1 small bag of fresh spinach
2 cans of Italian style diced tomatoes (I just used regular diced tomatoes, I couldn’t find Italian style)
1 box or 4 cups of vegetable broth
1 block of cream cheese- cut into chunks

Put all of the ingredients in the crockpot. Cook on low for 5-6 hours.

Personalized Knife Block and Cookbook Holder update

I’ve seen some really cute personalized knife blocks floating around on Pinterest, so I thougth I would go ahead and put together my own! Since aqua is one of my latest color obsessions, I picked up some aqua paint from Wal-Mart (Key West by Apple Barrel)

I put two coats of paint on the knife block and allowed it to dry for a few hours. 

After that, I used my Cricut to cut out a fleur de lis using black vinyl. I just stuck the sticker to the front of the block and voila! 


Also, do you remember the plain jane cookbook holder I picked up at Target a few weeks ago?


I gave it a quick update, using my Cricut and some vinyl that I already owned!

I used Cricut Craft Studio to create a Monogram (Calligraphy Cartridge) and cut it out with red vinyl. Now I have a cute updated Cookbook holder! 


Have you done any fun Home Decor Cricut projects lately? I’d love to see them!

Elastic Headbands


I’m sure all of you have seen the elastic ribbon headbands and hair ties floating around the internet and basically every store with hair accessories. 

Just like every trend out there, I had to check them out!

I went to Hobby Lobby to look for some elastic ribbon and unfortunately I had no luck whatsoever. 

After looking around online, I found that Sunshine Shoppe Supply is kind of the go to place. So, I ran over to their website and ordered up a bunch.

About a week and a half later, I had a package of pretty elastic ribbon in my mailbox! 


Obviously, this chevron obsession is out of control. 

I sat down one evening while watching tv and just went for it. 

I cut 18 inch pieces for each of the headbands (perfect fit!) and then I used 9 inch pieces for each of the hair ties. 


In order to make the headbands and hair ties, you just have to fold the elastic in half and tie the ends together. Easy peasy and now I have a headband to match every t-shirt! ;)


Friday, October 25, 2013

Wine Cork Magnets

Last week, I found a big package of magnets in my craft cabinet that was begging to be put to use. So, who I am to tell it no? After spending some time scrolling through Pinterest I decided that some Wine Cork Magnets would be a good way to use both my magents and my big pile of wine corks. 

Justin played the role as big strong man and cut the corks in half for me. He looked online for tips on cutting up the corks and found that regular corks are not as easy to cut.. and they suggested using a saw. However, the corks I gave him were corks from Barefoot Wine, and they were easy to slice right through with a knife. 

I used some E6000 glue to attach the cork halfs to some ceramic magnets. I let them dry overnight and put them on the fridge the next day. They look fantastic and finally all my magnets match perfectly. 


What do you think? Have you done any fun wine cork projects?

Thursday, October 24, 2013

Chevron Burlap Bow

Last week, when I was home with a sick little girl I decided it was a good chance to tackle my  completely unorganized craft cabinets. 

When I had craft night last weekend, I could not find ANYTHING. I felt a lot like Monica from Friends during the episode where she had the super messy closet. All of the rest of the house was clean and organized, but my craft cabinet was embarrassing and likely to cause a small avalanche.

So while I was sorting things out, I started to make a list of projects I need to finish up. 

One of the items on my list were to make a chevron burlap bow! I had a piece of burlap (about 9 inches long) that was left over from my summer wreath project, and I thought it would be a super cute barrette! All I did was lay the ribbon flat, face down and then fold both of the sides in so that they would meet in the middle. 


I hot glued the ends together and pinched the ribbon in the middle to make a bow. I used a piece of twine around the middle of the bow to keep it in place, trimming the end of the twine after it was tied.  Next, I just hot glued it to a barrette.. and ta-da! Super cute burlap bow! 


Sunday, October 20, 2013

Enchilada Casserole


I run into some amazing recipes on Pinterest! When I found this one, I knew it was no different! I was also happy that the recipe came from TheNest.com. That website holds a special place in my heart because I met some of my best friends there! 

Sounds like fate to me! This made a HUGE meatless casserole and it was delicious. Just keep in mind that your avocado will start to turn brown after it is cut up and on the casserole for a while. So, I would have topped each plate individually. 

Serves: 6

Directions:

4 whole wheat flour tortillas (9 inch diameter), quartered

1 (19 ounce) can of sweet potatoes, drained
1 (19 ounce) can of black beans, rinsed and drained
1/2 cup chunky mild salsa
2 teaspoons chili powder

1 (14 ounce) can of tomato sauce
1/2 cup chunky mild salsa
1 cup grated light sharp Cheddar cheese

1 ripe large avocado, diced
1/4 cup finely chopped green onion

1/2 cup light sour cream

Directions:

Preheat oven to 450°F. Arrange half of tortilla pieces in bottom of greased 9 x 13 inch baking dish.
Mash sweet potatoes in medium bowl. Add next 3 ingredients. Stir. Spread evenly over tortillas in baking dish. Arrange remaining tortilla pieces over top.
Combine tomato sauce and second amount of salsa in small bowl. Pour evenly over tortillas. Bake, uncovered, in oven for 15 minutes. Sprinkle with cheese. Bake for another 5 minutes until heated through and cheese is golden.
Sprinkle avocado and green onion over top.
Serve with sour cream.
1 serving: 465 Calories; 11.4 g Total Fat (3.4 g Mono, 1.3 g Poly, 4.1 g Sat); 17 mg Cholesterol; 81 g Carbohydrate; 14 g Fibre; 21 g Protein; 1294 mg Sodium


Friday, October 18, 2013

I Love You More Than Bacon burlap sign.

A long time ago I saw a sign that said "I love you more than bacon." I automatically fell in love and filed it away in my mind as a future project.

Of course, I then forgot all about it. Until I was at the craft show and I saw the sign again. So, I decided to make my own!

I found a cute burlap canvas at Hobby Lobby for $4.99.

I cut out the letters on some red vinyl with my Cricut using the Plantation cartridge on size 1.5 inches. 

After I added the letters, the sign just felt incomplete. Until I made and added a piece of bacon to the sign. Now, it's complete!

I found a template here: http://blog.seremeres.com/?p=149 (perfect!)

Then, I cut it out and traced it onto some red and white vinyl. I'm in love with the final product.

Now at least once a day I hear Felicia say "I love you more than baaaacon!"


I can't wait to find it a new spot in my kitchen!

Wednesday, October 16, 2013

Pumpkin Cheesecake Snickerdoodle Cookies

I stumbled on this recipe on Pinterest one evening and I knew I would have to try it out sooner rather than later. 

Some of my favorite things include pumpkin and cheesecake. This was bound to be a winner...so I hopped right over to Therecipecritic.com and I got straight to work... at like 9:00 pm. I'm out of control.

Anyway. This recipe was amazing, and I suggest that you try it out asap. 

Ingredients
  • 3¾ cups all-purpose flour
  • 1½ tsp. baking powder
  • ½ tsp. salt
  • ½ tsp. ground cinnamon
  • ¼ tsp. freshly-ground ground nutmeg
  • 1 cup unsalted butter, at room temperature
  • 1 cup granulated sugar
  • ½ cup light brown sugar
  • ¾ cup pumpkin puree
  • 1 large egg
  • 2 tsp. vanilla extract
  • Filling Ingredients:
  • 8 ounces cream cheese, softened
  • ¼ cup sugar
  • 2 teaspoons vanilla extract
  • Cinnamon-sugar coating:
  • ½ cup granulated sugar
  • 1 tsp. ground cinnamon
  • ½ tsp. ground ginger
  • Dash of allspice
Instructions
  1. In a medium bowl, whisk the flour, baking powder, salt, cinnamon, and nutmeg together. Set aside.
  2. In a kitchenaid mixer with a paddle attachment, beat together the butter and sugars on medium high speed until fluffy about 2-3 minutes.
  3. Blend in pumpkin puree, beat in egg and then add vanilla. Slowly add dry ingredients on low speed just until combined. Cover and chill dough for an hour.
  4. To make the cream cheese filling, blend cream cheese, sugar and vanilla together. Chill for an hour.
  5. Preheat oven to 350 and line your baking sheets with parchment paper. In a small bowl, combine the sugar and spices for the coating and set aside.
  6. To make the cookies, take a tablespoon of the cookie batter. Flatten it like a pancake and place a teaspoon of the cream cheese in center. Form another tablespoon of the cookie batter into a flat pancake shape and place on top of the cream cheese. Pinch the edges together sealing in the cream cheese and roll into a ball. Roll in the cinnamon sugar coating and place on the prepared baking sheet 2 inches apart.
  7. Repeat until the dough is gone and flatten the cookie dough balls with a heavy bottomed glass or measuring cup.
  8. Bake the cookies for 10-15 minutes or until the tops start to crack. Let cool on the baking sheet for 5 minutes and transfer to a wire rack. Enjoy!

Here is the original recipe link for the pretty printable recipe! http://therecipecritic.com/2013/09/pumpkin-cheesecake-snickerdoodles/
Enjoy!


Sunday, October 13, 2013

Home Management Binder with FREE Printables!

Happy Sunday!

As you know, I am getting ready to start school later this month! This
means, for the next FEW YEARS (OMG) I am going to be busier than I
have been. You know, with: 2 kids, a husband, a house, a full time
job, an Avon business, and a blog… why not throw school into the
equation?  It will all in worth it in the end of course.

However, this did make me fully aware that I need to get some things
organized around here. You know, nothing big, just my entire life.

I’ve seen a lot of Home Management Binders floating around on
Pinterest and I knew that was just what I needed. When looking through
my thousands of pins, I found great ideas, but unfortunately I
couldn’t find everything I needed. So I made my own printable sheets.

And since I am such a loving caring person I thought I would go ahead
and share them with you! I have listed them out here and grouped
together the way I have them organized in my binder. Feel free to
print these off and use them as needed. Just don’t sell them!

I got the Chevron backgrounds from the lovely ladies over at: TwoMagicalMoms.blogspot.com
Check that blog out when you get a chance. It’s nothing short of
fantastic. I promise.
Here is the post I found them on:
http://twomagicalmoms.blogspot.com/2013/03/free-chevron-digital-papers.html

Just save these printable pages as photos and print them off as 8x10 photos.

Book Cover:


Under my "agenda" tab, I added monthly calendars.These are blank calendar templates so that you can use them for any month.


Next in my binder are my "Cleaning" tabs
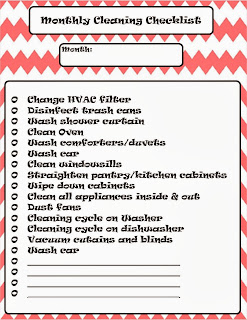
Here is my weekly cleaning schedule and monthly cleaning schedule. I left room at the bottom of each so that I can add to them as needed.


I'm pretty much in love with my weekly menu sheet under my "Menu" tab. There is room to write the dinner menu for each day of the week... and to write down the grocery list.


My "Budget" tab is where I have my Monthly budget sheet and my account register for our "bill pay" checking account. It's also where I put my Login Info sheet. I wrote down all of the usernames/ passwords for the Utility companies, and I am no longer the only one with access.


The "Medical tab" is the place for all of our medical information. I think I'll also make copies of the Insurance cards to keep in here.


Under the To do folder I added a master To Do List and a Christmas Shopping list.


Last but not least I have a "Contacts" tab. I pulled out my address book that I bought 4 years ago and copied all of the contact information for the people I am still in touch with. So, after I copied down those 5 whole entries... I shredded the rest of the book pages. :)


I feel so much better knowing that everything I need is in one place!

Enjoy!

Wednesday, October 2, 2013

Minecraft Printable Food Signs!

This weekend, I suddenly realized that I never posted my printable Minecraft food signs! Oops! I printed off all of these pictures as 3 x 5 photos onto some computer paper. I've had a box for printable postcards for most of my life. So, I folded each postcard in half to make a tent, and then I glued each of my food signs onto the tents.

 I set up a little food table for Rachel's party. And put the tents on display.

 For apples I used a bowl of apples.

 I had a bowl of baby carrots sitting out.
 Creeper juice was green lemon lime soda.
 Diamonds were a bowl of Hershey cookies and cream candies.

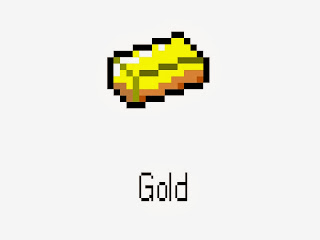
 Gold nuggets were a bowl of small chocolate bar.
 For sticks, I used pretzels.
The sticks of TNT was groups of Twizzlers.
Water was... well a bunch of bottles of water.

You are more than welcome to use my signs! I could not find what I wanted online, so I finally just caved and made my own.


Just save each of these pictures and print them off as 3x5 photos.

 I didn't manage to get a picture of the food table before the monsters I mean, sweet little girls, devoured it all.

But, here is a pic of how I used the TNT, Gold Bars and Diamonds for the goody bags!


Stay tuned for more pictures from a couple of other games we played at the Minecraft party!