Ok I refuse to let myself get behind again on blogging. Because by the end of it, it's just a task and not fun anymore.
Anyway, as you can see, I've done quite a bit, but worry not, I have a ton of ideas floating around! Ahhhhhhhhhh. What am I gonna do when this is over? I may need to learn how to knit or something.
But, for now, I'm not jacking with anymore wedding related stuff until after GI comes home and then leaves again. Christmas has got me so stressed out right now, I don't know where to begin, but I know I need to get something done soon!
I guess this is OK. If I'm stressing about cooking and presents and whatever else, I'm not freaking out him coming home. (mostly). I'm just so ready to see him. It's been a long 8 months and I'm on edge.Oh well, almost two weeks!

Saturday, December 4, 2010
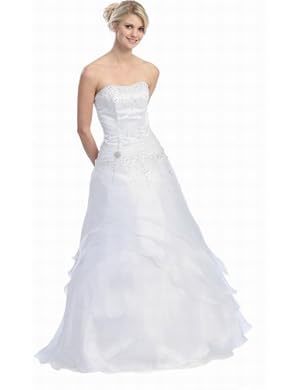
My dress!
If you are my GI.... stop reading right now!
I decided it would be ok to show off the dress because A) He doesn't have the link to this blog and B) I won't show myself in it, just the dress itself.
Anyway, I had no intention to buy my dress until after Christmas, but I ended up with an Amazon gift card from mypoints, some cash in my paypal account from surveys and I realized I had almost enough to get it! So, I added $50 in CHANGE that I rolled and I went for it!!
I bought this dress at Amazon.com and I'm in love. It makes me feel like a bride without a big crazy price tag. I can't wait to wear it! I'm going to do some more searching when it gets a little closer to the date for my Maid of Honor dress and my flower girl dresses.
 Just look for special occassion dresses and select white dresses under the women's clothing category on Amazon.com. They have a ton of great options that are probably meant to be prom dresses but make excellent wedding dresses for CHEAP! :)
I decided it would be ok to show off the dress because A) He doesn't have the link to this blog and B) I won't show myself in it, just the dress itself.
Anyway, I had no intention to buy my dress until after Christmas, but I ended up with an Amazon gift card from mypoints, some cash in my paypal account from surveys and I realized I had almost enough to get it! So, I added $50 in CHANGE that I rolled and I went for it!!
I bought this dress at Amazon.com and I'm in love. It makes me feel like a bride without a big crazy price tag. I can't wait to wear it! I'm going to do some more searching when it gets a little closer to the date for my Maid of Honor dress and my flower girl dresses.
I heart doilies.
When I think of doilies I think of a little old lady sitting in her rocking chair making doilies for all of her family members to throw into a drawer and never look at again... maybe that's just me.
But then I stumbled across a blog post about using them to make cupcake liners and got very excited about the idea! They are just paper doilies and so easy to make and fancy looking!
I had found directions online here. But I just bought a package of 25 cut them in half and then cut out the middle. wrapped them around a regular liner and voila! oh so cute!

While I was at it, I also made a banner for the candy buffet.
First I painted the doilies. This was STUPID and hard. The first one I laid down on a paper to paint and it stuck, so it ripped in half when I picked it up. I pretty much held it up and painted it above the paper and used light layers of paint. I've read there are colored doilies online. Those would have been so much more worth it!
Anyway, I stenciled the words "L-o-v-e is s-w-e-e-t" on the doilies. And then I carefully used some curling ribbon to attach them. I put tape on one of the holes that was already there, cut the hole and ran the ribbon through so the ribbon wouldn't rip the paper. Very time consuming, but cheap and cute!

DIY Aisle Runner

(names have been scribbled to protect us from online crazies) :)
This is a craft that is VERY popular on theknot.com, and for the longest time I was sure that I wasn't going to do it. I hadn't really planned on using an aisle runner, but the more I thought it, the more it seemed like a wedding isn't a wedding with an aisle runner... don't ask me why, it just seems like one of those elements that I needed.
So, I was totally stoked to pick up my aisle runner at half price at Hobby Lobby during one of their Bridal Blowout sales. This is regularly $30 for 100 yards.
Anyway, there are all kinds of variations online, and some brides will do a design on one end and another design on the other. I have NO IDEA how long my makeshift isle is going to be since we are doing this in an events center, so I just decided to decorate one end.
I scanned the "R" stamp that I picked up at Hobby Lobby (oh I heart that place!) and blew it up into a poster and printed it off. Next I typed up our names and this quote and printed them off as posters as well.
I taped the papers together (they each printed on four sheets) and then one at a time I laid them under the aisle runner and traced the letters with a tiny paintbrush and some leftover paint from my cardbox project. (I used a piece of cardboard under the papers to keep the paint from transferring onto my kitchen table.) It was dry pretty quickly, but I let it sit out for a couple of hours just in case.
I'm in love with the results. :)
Cheap and Easy Centerpieces and flower girl basket redo!
Ok, as you know I ended up throwing the jar centerpieces in the dumpster and started from scratch. I had seen this picture when googling centerpieces at least a thousand times but didn't put too much thought into it.


Well, on the night of the great centerpiece hunt I ran across it at least a million more times and decided I could definitely revisit the idea, but I had to keep it cheap.
I hit Dollar General and bought ten thick walled glass wine goblets and ten ivory colored votive candles. I had bought a boa at Hobby Lobby to redo my flower girl baskets, so I cut the remaining amount in half and wrapped it around the base.
I'm digging the results! I *might* get some sand to put in the glass to hold up the candle, but I'll have to try it out and see.

Oh yeah, I DID redo the flower girl baskets. I took off the ribbons and added some boa pieces that I hot glued to the rims. They are very cute! But it got messy for sure! (hot glue + feathers + clumsy me= my kitchen looking like I killed a hot pink chicken for dinner)

Redo of my tears of joy packets

Every time I looked at the pictures of the tears of joy packets I felt like something was missing and they were just entirely too plain. Since I still have quite a while until the ceremony I don't see any reason to not be 100% happy with all of my little details, so this was as good of a reason as any to do a redo!
I grabbed some more of the damask scrapbook paper that I love so much from Hobby Lobby and sat down with my paper cutter and go to work one night last weekend. I am absolutely stoked about the results.
I made this a little bit bigger by cutting the scrapbook paper into fourths and then folding them from there. (instructions here) When I was done I glued on the "for your tears of joy" labels to the front. For the labels I just printed them off on my printer in two columns, cut them with my paper cutter and glued them on.
LOVE THEM!
NWR: Not wedding related crafts! :) Christmas Garland and stockings

I bought four felt stockings at good 'ole Wal-Mart and printed off our initals. I used a font called Black Rose that I downloaded from dafont.com. I ended up altering the letters a little after I printed them because they were very loopy and complicated, which I wasn't in the mood for while cutting out felt.
I cut out the letters and then laid them down on top of some black felt that I already had laying around and cut around the letters since tracing didn't seem like it would be possible on black felt.
When I was done I glued them to the stockings with some Elmer's Glue and TA DA! Four stockings for $4!
When I was done with that I decided I was in love with felt and wanted.. needed... to do some more. So, I decided to make some garland to hang above our tv on the shelf (since I don't have a mantle, booooo).

First I used a drinking glass to trace circles onto the red and green felt, and then freehanded the top of the ornaments and cut them out also. Next, I glued the ornament tops to the circles and hot glued them onto pieces of curling ribbon. I alternated lengths, no real measurements... sorry!
When I was all done I glued the hanging ornaments to a long piece of ribbon and tacked them to my shelf.
This was a super easy craft that took about 30 minutes and added a little extra something to living room for free!

Subscribe to:
Posts (Atom)